Thursday, July 26, 2012

Little Collections

My three-year-old daughter loves to collect rocks.  She is always finding them and bringing them home.  We were storing them in a recycled wipe box on our front porch.  The problem was she really couldn't see or play with them.  They box was getting yucky, too.  Sitting outside it picked up a lot of dirt.


I saw this idea (I cannot remember where - so sorry!) for putting collections into old jars. I had an old plastic container leftover from Parmesan cheese we had bought at Costco.  It was the perfect size to store her collection.  I washed it inside and out and removed the label.  I had to use a little rubbing alcohol to remove the sticky residue from the label.


Then I hot glued one of the rocks on top of the lid.  This would act as a little decorative handle.


I spray painted the lid pink (my daughter's favorite color) and loaded the container up with her rocks.


It turned out so cute.  There is still room to add more rocks and I love that she can see her little collection.  We ended up putting the rock jar in her room on her dresser.  She just loves it!

How do you store little collections that your kids bring home?


PS  I'm linking up over at Delightful Order and Organize and Decorate Everything!

Tuesday, July 24, 2012

Weekly Goal Setting - Finding Balance

I told my husband last week that there are not enough hours in the day to accomplish everything that I wanted and needed to do.  He laughed and reassured me there is enough time - I just need to look at how I am prioritizing things.  If you want to do something in particular, than you need to put it at the top of your to do list.  It was a brief conversation, but it really got me thinking.  I already make a list of things I plan on doing over the course of the week.  What if I took it a step further and really thought about what I needed to do to gain a sense of accomplishment and set those things as top priorities?

I came up with a worksheet I intend to fill out each week (most likely on Sunday night when we are gearing up for the new work week).  The worksheet helps me prioritize what I want to accomplish over the course of the week.  I've included a skeleton of it here if you would like to use it too!


Basically, I plan on doing the following:

  1. Identifying the 5 most important things I must do that week (they don't have to be big).
  2. Briefly listing daily plans.  This will include places I'm going and specific chores I want to accomplish.
  3. Setting specific goals for business/hobbies. (I've got a lot of these...running a small business, blogging, taking care of my two kiddos, and teaching elementary school part time!)


The plan is to make more time in my day to spend quality time with my kids and to take some me time.  Plus, I'm one of those annoying amazing list people - If I write it down it most likely get's done.  And if I set it as a priority than it really will get done.  Right?  Wish me luck with this.  I'll post an update in a few weeks to let you know how it's going!

In the meantime, what do you do to organize your time?  How do you accomplish everything you want to in a given week?


Thursday, July 19, 2012

Organizing Baking Supplies - Creating Storage with the Strangest Things

I love when I can find 5 to10 minutes in a day to reorganize a cabinet or create a new organizing system.  On Monday I found a few minutes to grab all the loose cupcake tins in my pantry and store them in a cute Ball jar with a covered fabric lid (read about that here).  Yesterday I was able to reorganize my baking supplies.  It took about 10 minutes and my daughter got into the action, too!  As I unloaded the contents of the shelf, she put them on the counter.  After a quick wipe with a hot, soapy rag, the cupboard was ready to be refilled.


I had a lot of loose cupcake/cookie decorations that were constantly falling over and taking up too much space!  I thought about picking up a storage container to stash them in, but remembered I was holding onto this plastic bag that contained a baking set my daughter had received for Christmas.  (I didn't want to throw it out - I just felt it would be wasteful).  I decided to store all the loose cupcake/cookie decorations in the bag and it worked out perfectly!  They fit in nicely and I was able to stand it up in the cupboard.  I can not tell you how much room it freed up!


One of the tough things about my kitchen pantry is the shelves are super deep.  Since I don't use the baking supplies on a daily basis, I put them on the top shelf in the back.  I put all of our breakfast goodies (oatmeal supplies, tea, and cereal) in the front of the cabinet for quick access.


And that was it.  All done.  It only took a few minutes to straighten the shelf up and best of all - I came up with a quick, FREE way to organize my cupcake/cookie decorations.


What have you organized lately?  Have you found a way to repurpose something?


PS  You can find this over at the Delightful Order Inspiring Thursday Link Party!

Monday, July 16, 2012

Organizing Cupcake Tin Liners

A few months ago I struggled with finding organization in my kitchen pantry (you can read about that here).  I've since brainstormed a few ideas on how to re-organize my baking supplies and hopefully create more space on the top shelf of my pantry.

I found a little inspiration this week and decided to tackle storing my cupcake supplies - mainly the liners and decorations.  I was able to whip out a handy storage container for the liners in between making dinner and baking cookies with my daughter.  Sure I neglected the dishes in the process, but you can't beat time spent with the little one while multi-tasking and completing a small organization project!


First I organized the liners by color/theme.  I then stacked them in a clear Ball canning jar that I already had.  I cut a small piece of remnant fabric that I had left over from a different project (a doll house we built - more on that in the coming weeks) and secured it to the lid with spray adhesive.  After it dried, I put the lid back on and voilĂ  - a cute little storage container for all those liners that were floating around in the pantry.


Next up, organizing all those pesky cupcake decorations.  What small organization projects have you recently tackled?  I would love to hear about them!


Tuesday, July 10, 2012

DIY Wooden American Flag

My mother-in-law gave me a few back issues of BHG.  I was drawn to this DIY wooden American Flag in the June 2012 issue.

Source: blogher.com via Natalie on Pinterest


Then one day on Pinterest, I saw this amazing flag made from reclaimed pallets.  Hmm...I can definitely do this!


My husband and I spent a few days trying to find pallets on Craigslist.  They are apparently a pretty hot commodity in my town!  After spending a fruitless Saturday morning driving around to different Craigslist listings, we realized we were out of luck.  They were all gone!  We rethought our design plan and decided to use scrap wood we already had on hand.

This is what we started with.


I spray painted the wood white with spray paint I already had on hand.


Then I painted a blue square in the upper left corner and taped off the stripes.  I picked up a few paint samples from Home Depot in red and blue.  (The only thing I had to buy for this project!  So awesome!)


After painting the stripes red, I cut a template out of cardboard for the stars.  I just held it over the blue and dabbed white paint over the cardboard.  I didn't mind that it wasn't perfect.  I kind of liked the homemade look.


After the paint dried, I attached hardware and wire to the back so that I could hang it on the wall.  Don't mind the old contact paper.  The scrap wood was actually an old shelf from my in-law's kitchen cabinet.


I love the final product.  I probably could have made the blue a little longer - more rectangular - and the stars a little more uniform.  My husband and I talked about possibly redoing the stars.  A few people who have done similar projects used temporary stickers.  I really don't want to spend anymore money on this project so the stickers are probably out.


I still love it though.  It looks great on the blue siding and hanging over our vintage metal porch chairs.  Plus, it a perfect decoration for the season!


Has Pinterest inspired you lately? I would love to hear about it!  


Oh!  I noticed that Young House Love is doing a Pinterest Challenge this week.  I plan on sharing this project over on their AMAZING blog (and on Centsational Girl, Bower Power, and Ten June!

You can also find it over on Positively Splendid.


Monday, July 9, 2012

Pink Princess Party

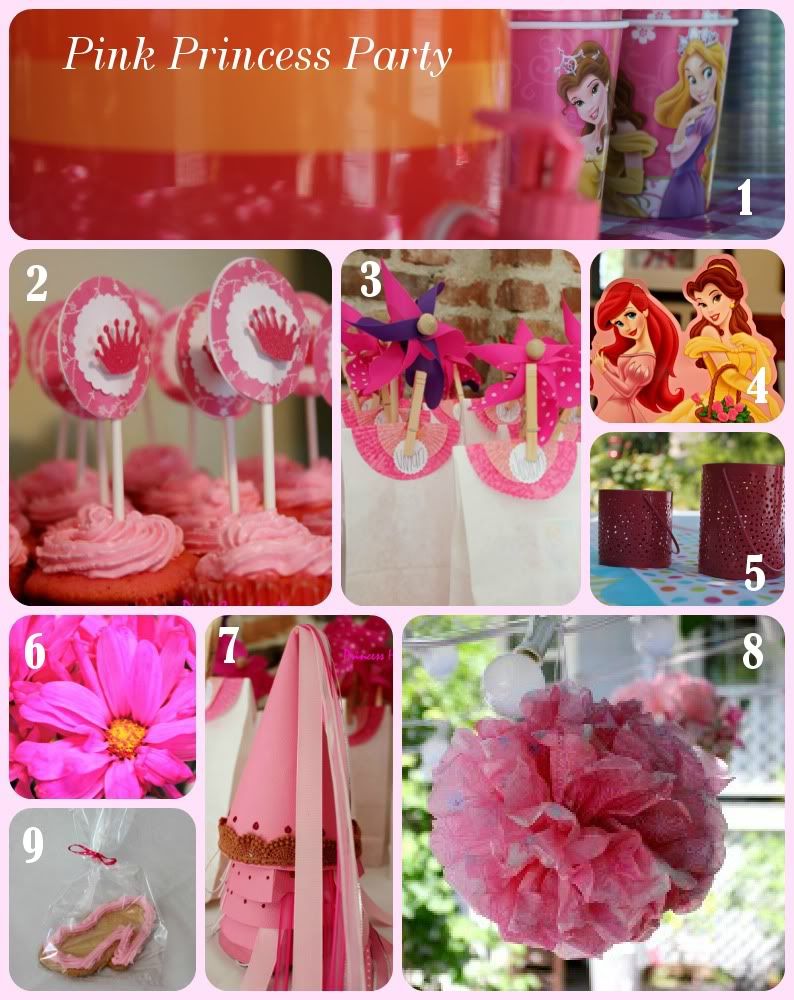
My daughter requested a Pink Princess Party for her 3rd birthday.  I had such a good time planning the party and searching for all things 'pink princess.'  We had a special request that Belle and Ariel make an appearance, so I found a few decorations that were specific to these Disney princesses.  Here are a few highlights....


1.  Pink lemonade in a pink dispenser I found at Target for under $10.  Target also had the Disney princess cups.

2.  I made the cupcake toppers with scrapbook paper and cake pop sticks.  The crowns were found on Etsy.  I attached them with double-sided puffy tape to the white circle (also from Etsy).  The scrapbook paper was at Michaels and I used a circle cutter to cut the circles out of the patterned paper.  The white circle with the crown was glued to the scrapbook paper.  I hot-glued this to the cake pop stick and added a white circle to the back to make the back look nice and clean.  The pink cupcakes were made from a recipe I found in a Better Homes and Gardens magazine.  I colored the frosting pink, too.

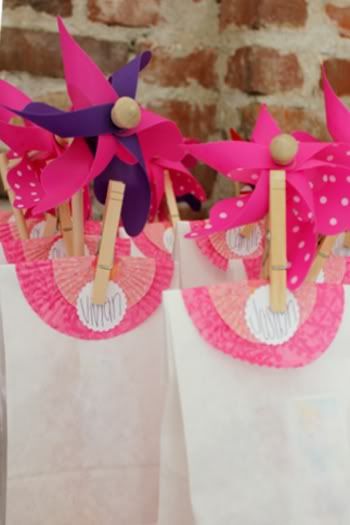
3.  Pinterest was the inspiration for the goodie bags.  Cupcake holders and a small circular name plate were attached to the bag with a clothespin.  So simple and easy.  The pinwheels were $1 each at Target.  I also found princess duckies, princess stickers, and candy necklaces with a small crown on Amazon.  We had a few boys at the party so I was sure to have a few pirate items for them.


4.  The table centerpiece was Disney princess.  I found this on Amazon, too.

5.  I love the clearance section at Target.  These lanterns were less than $2 each.  They made a nice addition to the table and helped hold the tablecloth down when the evening breeze kicked in.

6.  A bouquet of pink flowers.

7.  I found princess hats at Target but they were terribly expensive ($3 a hat!).  I made these using a template I found online.  I used glitter glue and ribbon to decorate the hats.  They were simple to make and came in at under $1 a hat.  The girls loved them!  For the boys, I made a few hats in black and added pirate stickers.

8.  I strung party lights across our patio and attached these DIY pom-poms.  It really set the atmosphere.

9.  We made princess cookies to hand out to the adults.  The cookie cutters were from Michaels and we used a simple sugar cookie recipe.

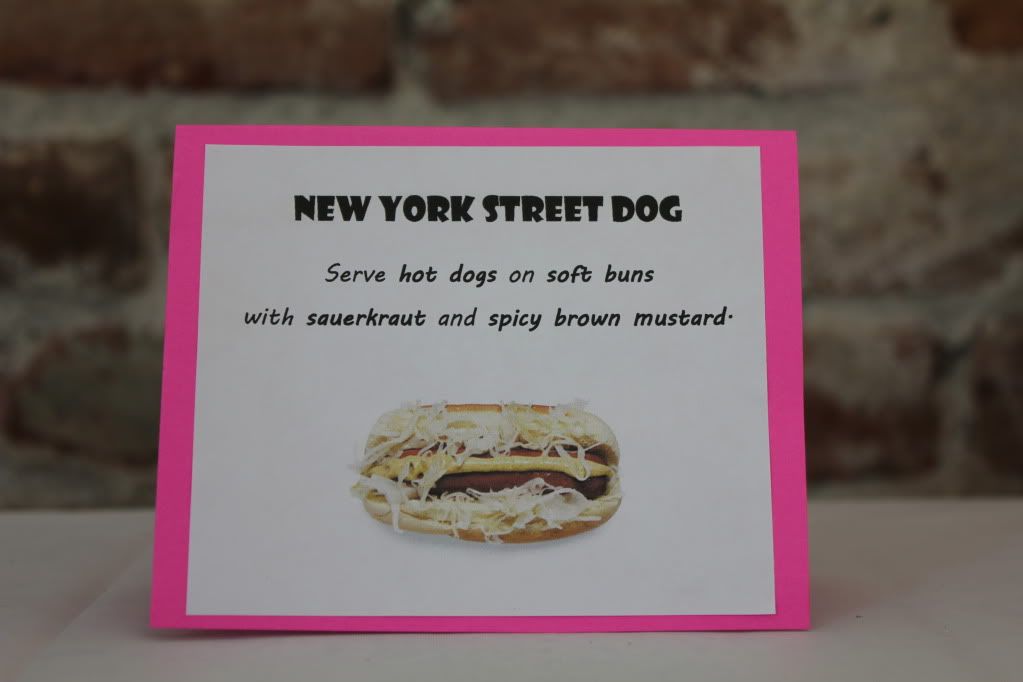
To keep the cost down, we had the party at home.  It was really hot (over 100 degrees) so we had kiddie pools for the kids and misters for the adults.  We also barbecued hot dogs (super easy and cheap).  To make it fun, we had a hot dog bar.  I made little cards with suggested topping combinations I found on the Food Network website.  It was a lot of fun to see what people put on their hot dogs.  Some were very adventurous!


The party was a blast.  My daughter had a great time and really enjoyed that everything really was pink!

Have you planned a party recently?  I would love to hear what you did and what inspirations you found online!


P.S.  I'm sharing this post at Positively Splendid!  You can also find it over at Delightful Order, One Artsy Momma, and  Happy Go Lucky!


Happy Go Lucky

Tuesday, June 12, 2012

Master Bedroom - Yea Progress!

We have taken a break from the basement project we started (you can read about that here).  The four boxes we still need to go through remain where we left them.  A few things have come up, and to say we have been a little sidetracked is an understatement!  (Do not fear - those four boxes are on our list to tackle this week!).

Instead, I painted the master bedroom (and potty trained a two-year old).  I know!  Why start a huge project(s) when you haven't finished the last huge project?  Well - this past weekend we had an opportunity to visit my parents and pick up the matching dresser to our (borrowed) bedroom set.  (I say borrowed because this is a temporary solution to our lack of bedroom furniture and storage.  My brother will eventually use this furniture in his house.)  Before we picked up the dresser, I really wanted to repaint the walls. A few months ago my husband mentioned he hated the blue paint and would love to change the colors.  I thought it would make life so much easier to repaint before we brought the new dresser home.  And there begins a new major project.

Here are a few before and after pictures (please forgive the horrible photography - I am taking classes to get better!)

View from the door.  We moved the taller dresser and changed the direction of the bed.

Imagine a DIY headboard in a khaki color (maybe) with a DIY circular drift wood mirror above the headboard.  Just imagine!  Really...the vision is there.
View from the bed to the bedroom door.  Ignore the blue lamp.  It's a DIY project that is not yet completed.  I still need to rewire the lamp (which will straighten the shade).  Imagine a wall gallery with dark gray frames above the dresser.

The plan is to wall paper the inside of the closet (it's currently pink) and revamp the storage that is already there.  We are going to also add a curtain over the door when we redo the window curtains.
So progress...I love it so far!  The new colors are softer and more welcoming.  Moving the bed actually added space.  And I cannot tell you how nice it is to have nine (yes, nine!) extra drawers!

Here is what is left on our master bedroom list:

Master Bedroom Re-Do
Change the paint color.
Wallpaper the closet.
Add a tension rod and curtain over the closet.
Find a cute tie-back for the closet curtain and window curtains.
Change window curtains (dark blue or gray).
Move tall dresser.
Get the matching dresser from my parents.
Move coat hooks.  Create a “coat” space for us + guests.
DIY headboard for our bed.
Build two shoe boxes for under the bed.
Find a bed skirt (debating on the color).
Update bed sheets and duvet cover.
Rearrange pictures.
Decorative pillows for bed.
Make one of the pillows from bird fabric (have).
Jewelry stand/photos wall over dresser.
DIY drift wood mirror.


Have you ever started a project only to get sidetracked by another?  I would love to hear your story.


Related Posts Plugin for WordPress, Blogger...